One Mac. Small Xamarin team. How to. Part 2
Welcome in this long awaited part 2 of the serie “One Mac. Small Xamarin team. How to.”.
In part 1, we saw what possibilities in terms of hardware are available when developing for iOS with Xamarin (if you missed it, it’s still time to read it).
Today, I will explain how to leverage a single Mac for a small team, and how to enable simultaneous debugging between developers. This post is applicable to every Mac machines. A good candidate for such a setup would be either a Mac mini or a Mac Pro.
I won’t go into details about developer certificates and provisioning profiles.
Contents:
The Mac Side
Prerequisites
Before we start, make sure you have the following already set up.
- A Mac, with the latest OS if possible. (at the time of writing: macOS Sierra)
- Xcode installed (at the time of writing: Xcode 8.2.1)
- Xamarin Studio/Visual Studio for Mac installed
You won’t have to install all these softwares on each account as they will be globally available. And lastly, the Mac should be connected to your network and be reachable by any of your team mates.
Create the accounts
The first step to allow several developers to use the Mac simultaneously, to build and debug on both simulator and real devices, is to create each of them an account on the Mac. We can achieve that by manually creating those accounts or automate their creation by connecting the Mac to an Active Directory.
Both solutions take place in the “Users & Groups” section of System Preferences.
If you’re manually creating the account, just add a standard account. Like this:

Repeat that step for each of your team mates and you’re done.
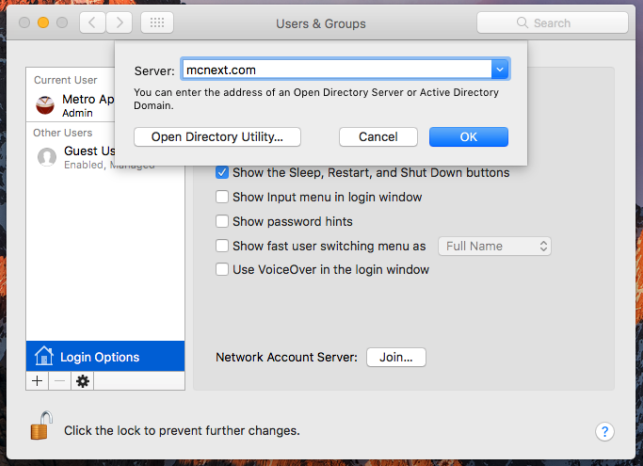
If you decide to let an Active Directory manage the accounts, you can join it in the “Login Options” tab. Click the “Join…” button of Network Account Server. To complete this step, you will need to have the login and password of one of the AD administrators.

Note: macOS is currently not able to join an Azure Active Directory. If you’d like such feature, vote for it on feedback.azure.com.
Make sure the “Allow network users to log in at login window” is ticked on. That way, anytime a new AD user connects to the Mac, his account will be automatically created.
Enable remote access
Now that we have created every accounts (or that we delegated their creation), we need to allow the users to connect to the Mac both through Visual Studio’s Xamarin Mac Agent and VNC.
The former requires us to activate the “Remote Login” service that allows for ssh access. To do that, we need to go to the “Sharing” section of System Preferences and tick on “Remote Login”. Make sure “Allow access for all users” is also ticked on (“Only these users” is also a valid option, as long as you add every of your team members’ accounts).

In order to allow developers to access the Mac and configure their Xcode with an Apple Developer account so that they can download provisioning profile, we need to put a remote desktop service in place. OS X has a really great feature for this: it can natively be a VNC server without anything to install.
We can activate this feature by going in the “Sharing” section of System Preferences. There, just turn on the “Screen Sharing” service and allow access for all users (again use “Only these users” if you want).

Now whenever someone wants to access the Mac through a VNC client, he will be asked of his credentials. When done, he will access his own account.
OS X is capable of handling several sessions running simultaneously when using VNC, so each developer can use it independently.
And that’s all for the global configuration part! Now we’ll see how each developer needs to configure his Mac account and Visual Studio so that he can build and debug iOS apps directly from Visual Studio.
The Developer Side
Prerequisites
I will only talk about Visual Studio on Windows. So here’s the prerequisites :
- Visual Studio 2015/2017 installed
- Xamarin for Visual Studio installed
- VNC client (like RealVNC)
The computer needs to have access to the same network as the Mac, and be able to communicate with it.
Remote access and configuring Xcode
Before doing anything, we should connect to the Mac via VNC. The important part here is to use your own account to access it so that it will open your own session.
If you have set up an Active Directory, it will be at the time of the first connection that the account will be created.

Now is a good time to configure Xcode to use your Apple developer account and download any provisioning profile that you will need. The Xamarin.iOS compiler (and by extension Visual Studio) will rely on those configurations to actually build your app.
You’re also free to do whatever you want on the Mac. You could, for example, install git and clone your repository. That way, you could make your storyboards directly on the Xcode designer!
Remember, you’re on your own session with its own home directory!

A warning though: VNC can be quite sluggish so it can be a little frustrating to work through remote access.
Configuring Visual Studio
Lastly, we need to configure Visual Studio. This part is simple. Xamarin also helps you with a tutorial right inside Visual Studio.
With a Xamarin.iOS project loaded, you will be able to access the Xamarin Remote Agent icon.

Click on it and just search for the Mac, either by its name or by its IP address.

To connect, Visual Studio will ask for the credentials to use. It’s important to give your own credentials! That way, it will connect to your session to build and debug. It’s the key to allow several developers to debug at the same time.

Visual Studio will be able to connect only if your session is currently running, so remember to log in through VNC beforehand. Otherwise you will end up with the following console output:
Starting connection to Mac mcnmac002.local....
The user must be logged in on the Mac in order to execute an SSH command.
Disconnected from the Mac mcnmac002.local.
This will be true every time you start Visual Studio and try to build/debug a Xamarin.iOS app.
Building, debugging and simulating for iOS
And that’s it for the Developer side! You can now build, debug, and use the simulator simultaneously on a single Mac.
If you want to deploy on a real device, you will still need to plug it into one of the Mac’s USB ports. Xamarin has announced some time ago an iOS USB Remoting feature, but as of the time of writing, we’re still waiting for it.
Make sure to try out the Remote iOS Simulator for Visual Studio! It will be a little easier to use than the iOS Simulator on the Mac through VNC.
Limitations
There’s some drawbacks when using this setup.
- You will need a slightly more powerful machine, compared to when you have your own Mac, as it will need to handle remote access and simultaneous build/debug/simulators.
- Disk space will quickly vanish due to how Xamarin Studio works (huge caches per user, Android SDK installed once per user by default).
- Remote builds are noticeably longer than direct builds
- The Visual Studio’s Mac Remote Agent needs a running session on the Mac, and it can be quite erratic (this was especially true some months back on VS2015)
- Remote access with VNC is not optimal.
- There could be some delay for the screen to refresh.
- Even worse, if there’s no screen plugged in the Mac, VNC will only stream a resolution of 640x480. Huge black rectangles will appear on the screen making it near unusable. I recently bought a small HDMI plug that emulates the presence of a screen (you can find it here on Amazon) and it solved those issues (1080p stream, no black rectangle).
Conclusion
Despite the length of this post, we saw that configuring a Mac to allow several developers to work it simultaneously is quite simple and straightforward. It even works remarkably well!
It can be a good solution if you’re low on budget or the number of iOS projects don’t justify the cost of buying every single developer a Mac. But if you can, prefer to equip everyone of your team mates with a MacBook Pro or equivalent. It will spare you a lot of misadventures.