Authenticate users through Google with Xamarin.Auth
I’ve recently worked on a Xamarin app that needed to authenticate its users against Facebook, Google, and Twitter, and needed to retrieve their email addresses. Xamarin.Auth did the heavy lifting for us, handling all the OAuth authentication flow. But configuring it for Facebook, Google, and Twitter can be complicated as their configurations are (not so) slightly different.
After quite a bit of struggle, I decided to share every single steps that led me to successfully implement authentication and getting the user’s email address.
In this post, I will focus on integrating Google authentication in your app.
If you’re eager to see some code, here is a sample app: https://github.com/TimLariviere/Sample-XamarinAuth-Google
Google authentication with Xamarin.Auth
Previously Google allowed the use of in-app webviews to handle the authentication flow, like what Facebook and Twitter do. But at the start of the year, Google changed its policy for native apps.
It now requires the use of native browsers through libraries (CustomTabs on Android and SFSafariViewController on iOS) Xamarin.Auth uses by default an in-app webview, but it also supports CustomTabs/SFSafariViewController by enabling the IsUsingNativeUI flag. While it is fully supported, it can be quite complex to compile and run successfully.
Configuring the Google Developer Console
Before coding, we first need to properly declare a new project in the Google Developer Console to get the identifiers required by Xamarin.Auth.
For that, go to https://console.developers.google.com
There, you will be able to create a new project. 
Once it’s done, go to “Credentials” and configure the “OAuth consent screen”. You will need to set at least the “Product name shown to users”, otherwise Google won’t let you create keys for Android and iOS. 
Now we need two OAuth client ID, one for each platform. The information needed differs from Android and iOS.
Let’s look at Android first. 
- Name: It can be anything you want
- Signing-certificate fingerprint: the SHA-1 fingerprint of your keystore certificate that will sign your APK
- Package name: the package name of your app
You can find the signing-certificate fingerprint using the command shown. 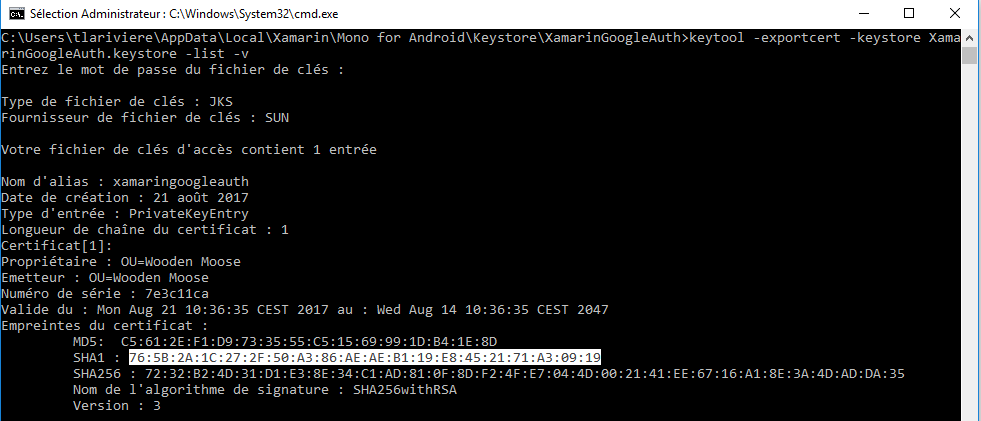
You will need as many OAuth Client ID as you have Keystore files to sign your app (Debug, Production, etc.).
For iOS, it’s a little simpler. 
- Name: It can be anything you want
- Bundle ID: the package name of your app
- App Store ID: the id of your app on the App Store
- Team ID: the id of your team on developer.apple.com
The last two fields are optional and allow you to retrict the usage of the OAuth Client ID to only your app.
Upon creation, Google will give you the client IDs that we need. 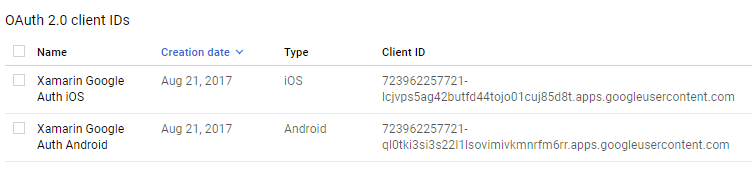
And that’s all for the Google Developer Console part. Let’s see how to actually implement Xamarin.Auth in a PCL library, shared by Android and iOS.
Implementing Google authentication in the PCL project
1. Installing the NuGet packages
First, we’ll need to add the Xamarin.Auth NuGet package to our PCL project. For this sample, I’ve downloaded the latest version on NuGet which is 1.5.0.3. 
Then, as we plan on getting the user’s email address, we’ll need to call some REST APIs that will reply in JSON. Just add a reference to the latest Newtonsoft.Json package (10.0.3 at the time of writing).
2. Using Xamarin.Auth
As Google authentication is OAuth2, we will use the OAuth2Authenticator class provided by Xamarin.Auth. This class comes with several constructors but only one interests us.
new OAuth2Authenticator(
    string clientId,
    string clientSecret,
    string scope,
    Uri authorizeUrl,
    Uri redirectUrl,
    Uri accessTokenUrl,
    GetUsernameAsyncFunc getUsernameAsyncFunc = null,
    bool isUsingNativeUI = false);
- ClientId: the id that we’ve generated on Google Developer Console (Android/iOS)
- ClientSecret: not needed by Google
- Scope: magic string telling which permission to grant on authentication
- AuthorizeUrl/AccessTokenUrl: Google’s URLs required when authenticating
- RedirectUrl: custom url (doesn’t need to exist)
- GetUsernameAsyncFunc: we won’t be using it
- IsUsingNativeUI: the famous flag to enable in order to comply to Google’s new policy
Xamarin.Auth will query the AuthorizeUrl with our ClientId and Scope. Then, when the user will be authenticated in his web browser, Google will call our RedirectUrl with a bunch of parameters. Xamarin.Auth will catch this RedirectUrl (with our help, we’ll see that later) and parse it. Then it will call the AccessTokenUrl to get the actual token that will allow us to call APIs as the authenticated user.
AuthorizeUrl and AccessTokenUrl can be retrieved in the Google documentation. The Scope can be also retrieved in the Google documentation. Though we will use the “email” scope for our sample.
I’ve extracted the ClientId and RedirectUrl from the PCL project, as it will differ from Android and iOS.
Here’s the result for my sample app:
Auth = new OAuth2Authenticator(
    Configuration.ClientId,
    string.Empty,
    "email",
    new Uri("https://accounts.google.com/o/oauth2/v2/auth"),
    new Uri(Configuration.RedirectUrl),
    new Uri("https://www.googleapis.com/oauth2/v4/token"),
    isUsingNativeUI: true);
The OAuth2Authenticator class comes with two events: Completed and Error They’re quite simple to understand. The first one will call our handler when the authentication has completed (with the user authenticated or not) and the latter will allow us to react to an error (bad network, etc.)
Auth.Completed += OnAuthenticationCompleted;
Auth.Error += OnAuthenticationFailed;
When the authentication ends, OnAuthenticationCompleted is called and we can check if the user is authenticated and retrieve the precious OAuth token that we need to call other APIs.
private void OnAuthenticationCompleted(object sender, AuthenticatorCompletedEventArgs e)
{
    if (e.IsAuthenticated)
    {
        // The user is authenticated
        // Extract the OAuth token
        var token = new GoogleOAuthToken
        {
            TokenType = e.Account.Properties["token_type"],
            AccessToken = e.Account.Properties["access_token"]
        };

        // Do something
    }
    else
    {
        // The user is not authenticated
    }
}
N.B.: GoogleOAuthToken is part of the sample.
While Xamarin.Auth usually doesn’t need anything else to work, Google authentication is a bit more tricky because it uses NativeUI. Xamarin.Auth will not be able to react to the redirection to RedirectUrl made by Google. For that, we will need to intercept the redirection ourselves (inside the Android and iOS projects) and provide the URL to Xamarin.Auth in order for it to ends the authentication flow. That requires us to keep the OAuth2Authenticator instance somewhere. I usually stores it as a static field, and clean it when I’m done.
public static OAuth2Authenticator Auth;
That’s all for our Google implementation.
For a more detailed implementation, you can find the whole GoogleAuthenticator file used in the sample.
3. Retrieving the user’s email address
We have done the hardest part. Things are quite simple once we have the OAuth token.
There’s a Google REST API that allows us to retrieve the user’s email address: https://www.googleapis.com/userinfo/email?alt=json
public async Task<string> GetEmailAsync(string tokenType, string accessToken)
{
    var httpClient = new HttpClient();

    // Provide the OAuth token as an Authorization header
    httpClient.DefaultRequestHeaders.Authorization =
        new AuthenticationHeaderValue(tokenType, accessToken);

    // Query the API
    var json =
        await httpClient.GetStringAsync("https://www.googleapis.com/userinfo/email?alt=json");
    var email = JsonConvert.DeserializeObject<GoogleEmail>(json);
    return email.Data.Email;
}
N.B.: GoogleEmail is also part of the sample.
And we’re done for the PCL part!
Implementing Google authentication in the Android project
1. Setting the package name
First, make sure to set your package name properly. It needs to be the same as the one we declared for Android on the Google Developer Console. Here, I will set it to “com.woodenmoose.xamarin.googleauth”
AndroidManifest.xml
<?xml version="1.0" encoding="utf-8"?>
<manifest (...) package="com.woodenmoose.xamarin.googleauth">
    (...)
</manifest>
2. Installing the correct NuGet packages
The Xamarin.Auth package is required by the Android project as well, as we need it to actually run an activity using CustomTabs. Fortunately the CustomTabs Support library is a required dependency and will be installed automatically.
A bit of warning
If you continue and run the app now, you will end up with the following runtime exception:
System.MissingMethodException: Method 'Android.Support.CustomTabs.CustomTabsIntent.LaunchUrl' not found.
That’s because Xamarin.Auth with IsUsingNativeUI will rely on CustomTabsIntent.LaunchUrl, which is only present in v25 and beyond.
You’ll need to make sure that you have installed at least the version v25.1.0. For that, just update the Xamarin.Android.Support.CustomTabs package. The sample uses the latest version which is v25.4.0.2. (CustomTabs v23 comes with Support.v4 library which is not required anymore with v25, you can remove it if you want)
3. Intercepting the redirection
As I’ve said earlier, we need to intercept in place of Xamarin.Auth the redirection made by Google.
But first, we need to create that RedirectUrl. It can be anything you as long as it is a valid URL or respect the following scheme (protocol:/somedata). But as we don’t have control over the web browser, we need to make sure that Android warns us of the redirection.
For that, we will use deep linking. If our URL starts with our package name and the web browser tries to navigate to it, Android will launch our app, passing the URL as a parameter. The second part of the URL is just an identifier to differentiate other deep links that we may be using.
Here, our URL will be: “com.woodenmoose.xamarin.googleauth:/oauth2redirect”
Deep linking in Android requires an Activity with an IntentFilter.
[Activity(Label = "GoogleAuthInterceptor")]
[IntentFilter(actions: new[] { Intent.ActionView },
              Categories = new[] { Intent.CategoryDefault, Intent.CategoryBrowsable },
              DataSchemes = new[]
              {
                  // First part of the redirect url (Package name)
                  "com.woodenmoose.xamarin.googleauth"
              },
              DataPaths = new[]
              {
                  // Second part of the redirect url (Path)
                  "/oauth2redirect"
              })]
public class GoogleAuthInterceptor : Activity
{
    (...)
}
When the redirection happens, Android will create a new instance of the GoogleAuthInterceptor activity. In the OnCreate method, we can get the URL and pass it to our OAuth2Authenticator. Make sure to finish the activity as we don’t need it anymore.
protected override void OnCreate(Bundle savedInstanceState)
{
    base.OnCreate(savedInstanceState);

    Android.Net.Uri uri_android = Intent.Data;

    // Convert Android Url to C#/netxf/BCL System.Uri
    var uri_netfx = new Uri(uri_android.ToString());

    // Send the URI to the Authenticator for continuation
    MainActivity.Auth?.OnPageLoading(uri_netfx);

    Finish();
}
4. Running our project
The last step is to run the actual authenticator. This will launch the native web browser and initiates the authentication.
// "this" is the current activity
var intent = authenticator.GetUI(this);
StartActivity(intent);
All that is left is to glue together all the pieces to make the Google authentication works on Android and retrieve the user’s email address
Configuration.cs
public static class Configuration
{
    public const string ClientId =
        "723962257721-ql0tki3si3s22l1lsovimivkmnrfm6rr.apps.googleusercontent.com";

    public const string Scope = "email";

    public const string RedirectUrl =
        "com.woodenmoose.xamarin.googleauth:/oauth2redirect";
}
MainActivity.cs
[Activity(Label = "Xamarin_GoogleAuth", MainLauncher = true, Icon = "@drawable/icon")]
public class MainActivity : Activity, IGoogleAuthenticationDelegate
{
    // Need to be static because we need to access it
    // in GoogleAuthInterceptor for continuation
    public static GoogleAuthenticator Auth;

    protected override void OnCreate(Bundle bundle)
    {
        base.OnCreate(bundle);

        SetContentView(Resource.Layout.Main);

        Auth = new GoogleAuthenticator(
            Configuration.ClientId,
            Configuration.Scope,
            Configuration.RedirectUrl,
            this); // Completed/Error events

        var googleLoginButton =
            FindViewById<Button>(Resource.Id.googleLoginButton);

        googleLoginButton.Click += OnGoogleLoginButtonClicked;
    }

    private void OnGoogleLoginButtonClicked(object sender, EventArgs e)
    {
        // Display the activity handling the authentication
        var authenticator = Auth.GetAuthenticator();
        var intent = authenticator.GetUI(this);
        StartActivity(intent);
    }

    public async void OnAuthenticationCompleted(GoogleOAuthToken token)
    {
        // Retrieve the user's email address
        var googleService = new GoogleService();
        var email =
            await googleService.GetEmailAsync(
                token.TokenType,
                token.AccessToken);

        // Display it on the UI
        var googleButton =
            FindViewById<Button>(Resource.Id.googleLoginButton);

        googleButton.Text = $"Connected with {email}";
    }

    public void OnAuthenticationFailed(string message, Exception exception)
    {
        new AlertDialog.Builder(this)
            .SetTitle(message)
            .SetMessage(exception?.ToString())
            .Show();
    }
}
N.B.: GoogleAuthenticator is a PCL wrapper for OAuth2Authenticator that you can find in the sample.

Implementing Google authentication in the iOS project
1. Setting the package name
First, make sure to set your package name properly. It needs to be the same as the one we declared for iOS on the Google Developer Console. Here, I will set it to “com.woodenmoose.xamarin.googleauth”
Info.plist
<key>CFBundleIdentifier</key>
<string>com.woodenmoose.xamarin.googleauth</string>
2. Installing NuGet packages
Unlike Android, it can be done in a single step. Just install the Xamarin.Auth package in the iOS project.
3. Intercepting the redirection
Just like Android, we will set up deep linking.
For that, we need to declare a URL type in the Info.plist file. We only have to declare our package name as a potential URL scheme that will launch our app.
<key>CFBundleURLTypes</key>
<array>
    <dict>
        <key>CFBundleURLName</key>
        <string>Google Auth</string>
        <key>CFBundleURLSchemes</key>
        <array>
            <string>com.woodenmoose.xamarin.googleauth</string>
        </array>
        <key>CFBundleURLTypes</key>
        <string>Viewer</string>
    </dict>
</array>
Or with the editor of Visual Studio: 
Then every time Safari tries to navigate to a URL like “com.woodenmoose.xamarin.googleauth:/”, it will run our app and call the OpenUrl method of the AppDelegate class. Like we’ve done on Android, get the URL and pass it to our authenticator.
public override bool OpenUrl(
    UIApplication application,
    NSUrl url,
    string sourceApplication,
    NSObject annotation)
{
    // Convert iOS NSUrl to C#/netxf/BCL System.Uri
    var uri_netfx = new Uri(url.AbsoluteString);
    AuthViewController.Auth?.OnPageLoading(uri_netfx);

    return true;
}
4. Running our project
The last step is to run the actual authenticator. This will launch the native web browser and initiates the authentication.
var viewController = authenticator.GetUI();
PresentViewController(viewController, true, null);
Also when you’re handling both Completed and Error events from the authenticator, you will need to manually call DismissViewController because the SFSafariViewController doesn’t dismiss itself.
And we glue everything together, this time for iOS!
Configuration.cs
public static class Configuration
{
    public const string ClientId =
        "723962257721-lcjvps5ag42butfd44tojo01cuj85d8t.apps.googleusercontent.com";

    public const string Scope = "email";

    public const string RedirectUrl =
        "com.woodenmoose.xamarin.googleauth:/oauth2redirect";
}
AuthViewController.cs
public partial class AuthViewController : UIViewController, IGoogleAuthenticationDelegate
{
    public static GoogleAuthenticator Auth;

    public AuthViewController (IntPtr handle)
        : base (handle) { }

    public override void ViewDidLoad()
    {
        base.ViewDidLoad();

        Auth = new GoogleAuthenticator(
            Configuration.ClientId,
            Configuration.Scope,
            Configuration.RedirectUrl,
            this); // Completed/Error events

        GoogleLoginButton.TouchUpInside += OnGoogleLoginButtonClicked;
    }

    private void OnGoogleLoginButtonClicked(object sender, EventArgs e)
    {
        var authenticator = Auth.GetAuthenticator();
        var viewController = authenticator.GetUI();
        PresentViewController(viewController, true, null);
    }

    public async void OnAuthenticationCompleted(
        GoogleOAuthToken token)
    {
        // SFSafariViewController doesn't dismiss itself
        DismissViewController(true, null);

        var googleService = new GoogleService();
        var email =
            await googleService.GetEmailAsync(
                token.TokenType,
                token.AccessToken);

        GoogleLoginButton.SetTitle($"Connected with {email}", UIControlState.Normal);
    }

    public void OnAuthenticationFailed(string message, Exception exception)
    {
        // SFSafariViewController doesn't dismiss itself
        DismissViewController(true, null);

        var alertController = new UIAlertController
        {
            Title = message,
            Message = exception?.ToString()
        };

        PresentViewController(alertController, true, null);
    }
}

And that concludes this really lengthy post. Hope it helps.