Authenticate users through Facebook using Xamarin.Auth
Following the previous post on Google authentication, I will now focus on how to authenticate on Facebook with Xamarin.Auth and retrieve the user’s email address. In case you missed the Google post, you can read all about it here: Authenticate users through Google with Xamarin.Auth
As previously, a sample is available on GitHub: https://github.com/TimLariviere/Sample-XamarinAuth-Facebook
Facebook authentication with Xamarin.Auth
Unlike Google, Facebook doesn’t require us to use native SDKs to authenticate users. So we can let the IsUsingNativeUI flag of Xamarin.Auth disabled, which is hopeful because restrictions on the Redirect URL would have prevented us to enable it.
Facebook exclusively wants HTTP/HTTPS redirect URLs thus not allowing us to use the deep link technique as we’ve done in the previous post (well to be fair, we could but it would require us extra work).
With that in mind, configuring Facebook with Xamarin.Auth is essentially much simpler than Google.
Configuring the Facebook for Developers portal
Before starting, we’ll need to declare our app in the Facebook for Developers portal. Go to https://developers.facebook.com/apps
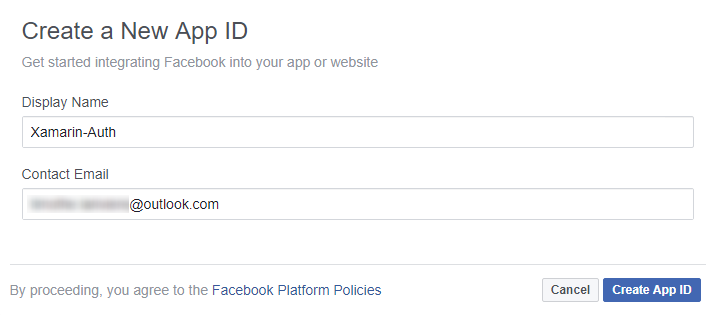
If you haven’t already, create a new App ID.
Once created, we’ll need to enable the OAuth feature by adding Facebook Login to our app declaration. For that, click “+ Add Product” in the left menu and then set up Facebook Login.

There’s only one thing that we need to configure in Facebook Login: the redirect URL that we will use to let Xamarin.Auth know that the authentication flow has ended.
That Redirect URL can be any valid HTTP/HTTPS URLs, it’s just an indicator that the authentication has completed and won’t be visible to your users. Facebook provides a default URL that you can use: https://www.facebook.com/connect/login_success.html

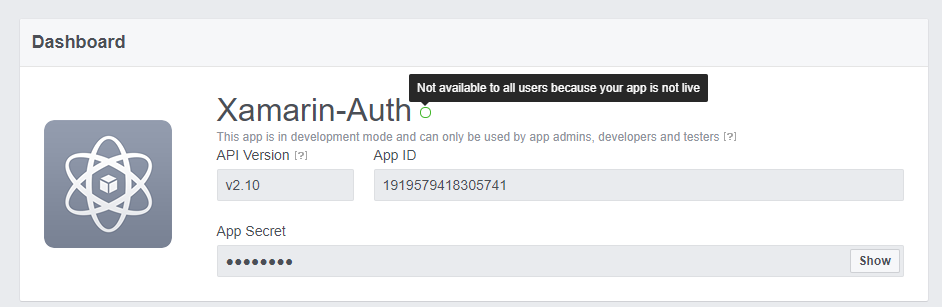
By default, our application is in development mode, only allowing members of our team (defined under Roles) to authenticate. Any other account will see a message stating that they can’t connect due to the development mode.
If you want anyone to access your app, you’ll need to switch to production. There’s a switch for that under App Review.

Notice that there’s already a few permissions given to our app including the authorization to retrieve the user’s email address. We’re lucky!
Make sure to note down the App ID as we’ll need it in our Xamarin apps.

And we’re done for the declaration part. Android and iOS will use the exact same configuration, so there’s nothing more to do.
Implementing Facebook authentication in the PCL project
1-2. NuGet Packages & Using Xamarin.Auth
I won’t go into details here, as I’ve already described it on the previous post.
For the sake of this post, here’s the 2 packages we’ll need:
- Xamarin.Auth (version used 1.5.0.3)
- Newtonsoft.Json (version used 10.0.3)
Like Google, Facebook authentication is done using OAuth2, so we will use the OAuth2Authenticator class provided by Xamarin.Auth. Facebook will automatically provide the Access Token once we’re authenticated, so there’s no need for an AccessTokenUrl.
This time, we will use this constructor signature.
new OAuth2Authenticator(
    string clientId,
    string scope,
    Uri authorizeUrl,
    Uri redirectUrl,
    GetUsernameAsyncFunc getUsernameAsyncFunc = null,
    bool isUsingNativeUI = false)
- ClientId: the id of our app on the Facebook for Developers portal
- Scope: magic string telling which permission to grant on authentication
- AuthorizeUrl: Facebook’s URL required when authenticating
- RedirectUrl: custom url (doesn’t need to exist)
- GetUsernameAsyncFunc: we won’t be using it
- IsUsingNativeUI: flag to use the device’s web browser instead of an embedded webview. We won’t be using it.
Xamarin.Auth will query the AuthorizeUrl with our ClientId and Scope. Once the user is authenticated in his browser, Facebook will call our RedirectUrl with a bunch of parameters. Xamarin.Auth will catch this RedirectUrl and parse it.
The AuthorizeUrl should have the value “https://www.facebook.com/dialog/oauth/”, according to the Facebook documentation. The Scope we will use is “email”. You can find the one you need in the Facebook documentation.
If you need to use a specific version of the Facebook OAuth API, you can specify it in the URL (like this “https://www.facebook.com/v2.10/dialog/oauth/”). You can find the oldest version allowed on the Facebook for Developers portal, next to the App ID.
Here’s the result for my sample app:
_auth = new OAuth2Authenticator(
    "1919579418305741",
    "email",
    new Uri("https://www.facebook.com/dialog/oauth/"),
    new Uri("https://www.facebook.com/connect/login_success.html"));
The OAuth2Authenticator class comes with two events: Completed and Error
They’re quite simple to understand. The first one will call our handler when the authentication has completed (with the user authenticated or not) and the latter will allow us to react to an error (bad network, etc.)
_auth.Completed += OnAuthenticationCompleted;
_auth.Error += OnAuthenticationFailed;
When the authentication ends, OnAuthenticationCompleted is called and we can check if the user is authenticated and retrieve the precious OAuth token that we need to call other APIs.
private void OnAuthenticationCompleted(object sender, AuthenticatorCompletedEventArgs e)
{
    if (e.IsAuthenticated)
    {
        var token = new FacebookOAuthToken
        {
            AccessToken = e.Account.Properties["access_token"]
        };

        // Do something
    }
    else
    {
        // The user is not authenticated
    }
}
N.B.: FacebookOAuthToken is part of the sample.
That’s all for our Facebook implementation.
For a more detailed implementation, you can find the whole FacebookAuthenticator file used in the sample.
3. Retrieving the user’s email address
Now that we have our Access Token, we can simply call the Facebook Graph API to retrieve the user’s email address: https://graph.facebook.com/me?fields=email&access_token=[ACCESS_TOKEN]
As you can see, Facebook requires the access token as a query param instead of an HTTP Authorization header.
public async Task<string> GetEmailAsync(string accessToken)
{
    var httpClient = new HttpClient();

    var json = await httpClient.GetStringAsync(
        $"https://graph.facebook.com/me?fields=email&access_token={accessToken}");

    var email = JsonConvert.DeserializeObject<FacebookEmail>(json);

    return email.Email;
}
N.B.: FacebookEmail is also part of the sample.
And we’re done for the PCL part!
Implementing Facebook authentication in the Android project
1. Installing NuGet packages
This is the part where Facebook with Xamarin.Auth is way simpler to set up than Google. Facebook didn’t asked for our package name, so it is not a required part of the sample (of course, set up your app’s package name when going for production).
As we don’t use the IsUsingNativeUI flag, there’s no need to update the CustomTabs Support Library and set up redirection interceptors.
All we have to do here is to install the Xamarin.Auth package to our Android project. N.B.: In case you plan to integrate Google login to your app later, follow the Google post instead.
2. Running our project
All that is left is to run the authenticator. By calling GetUI and StartActivity, we will tell Xamarin.Auth to display a webview to let the users authenticate.
// "this" is the current activity
var intent = authenticator.GetUI(this);
StartActivity(intent);
In order to make it easier to reuse the FacebookAuthenticator class from the sample, I’ve extracted the ClientId and Scope in a configuration file that I’ve put into the PCL project. Here’s the configuration I’ll be using for both Android and iOS
public class Configuration
{
    public const string ClientId = "1919579418305741";
    public const string Scope = "email";
}
And we can finally integrate Facebook in our Android app.
[Activity (Label = "Xamarin_FacebookAuth.Android", MainLauncher = true, Icon = "@drawable/icon")]
public class MainActivity : Activity, IFacebookAuthenticationDelegate
{
    private FacebookAuthenticator _auth;

    protected override void OnCreate(Bundle bundle)
    {
        base.OnCreate(bundle);

        SetContentView(Resource.Layout.Main);

        _auth = new FacebookAuthenticator(
            Configuration.ClientId,
            Configuration.Scope,
            this);

        var facebookLoginButton =
            FindViewById<Button>(Resource.Id.facebookLoginButton);

        facebookLoginButton.Click += OnFacebookLoginButtonClicked;
    }

    private void OnFacebookLoginButtonClicked(object sender, EventArgs e)
    {
        // Display the activity handling the authentication
        var authenticator = _auth.GetAuthenticator();
        var intent = authenticator.GetUI(this);
        StartActivity(intent);
    }

    public async void OnAuthenticationCompleted(FacebookOAuthToken token)
    {
        // Retrieve the user's email address
        var facebookService = new FacebookService();
        var email = await facebookService.GetEmailAsync(token.AccessToken);

        // Display it on the UI
        var facebookButton =
            FindViewById<Button>(Resource.Id.facebookLoginButton);

        facebookButton.Text = $"Connected with {email}";
    }

    public void OnAuthenticationCanceled()
    {
        new AlertDialog.Builder(this)
            .SetTitle("Authentication canceled")
            .SetMessage("You didn't completed the authentication process")
            .Show();
    }

    public void OnAuthenticationFailed(string message, Exception exception)
    {
        new AlertDialog.Builder(this)
            .SetTitle(message)
            .SetMessage(exception?.ToString())
            .Show();
    }
}

Implementing Facebook authentication in the iOS project
1. Installing NuGet packages
Same as Android, just install the Xamarin.Auth package to our iOS project.
2. Running our project
Same as Android, we run the actual authenticator.
var viewController = authenticator.GetUI();
PresentViewController(viewController, true, null);
Also when you’re handling both Completed and Error events from the authenticator, you will need to manually call DismissViewController because Xamarin.Auth won’t dismiss the webview itself.
And we glue everything together, this time for iOS!
public partial class ViewController : UIViewController, IFacebookAuthenticationDelegate
{
    public ViewController(IntPtr handle)
        : base (handle) { }

    public override void ViewDidLoad()
    {
        base.ViewDidLoad();

        FacebookLoginButton.TouchUpInside += OnFacebookLoginButtonClicked;
    }

    private void OnFacebookLoginButtonClicked(object sender, EventArgs e)
    {
        var auth = new FacebookAuthenticator(
            Configuration.ClientId,
            Configuration.Scope,
            this);

        var authenticator = auth.GetAuthenticator();

        var viewController = authenticator.GetUI();

        PresentViewController(viewController, true, null);
    }

    public async void OnAuthenticationCompleted(FacebookOAuthToken token)
    {
        DismissViewController(true, null);

        var facebookService = new FacebookService();
        var email = await facebookService.GetEmailAsync(token.AccessToken);

        FacebookLoginButton.SetTitle( $"Connected with {email}", UIControlState.Normal);
    }

    public void OnAuthenticationFailed(string message, Exception exception)
    {
        DismissViewController(true, null);

        var alertController = new UIAlertController
        {
            Title = message,
            Message = exception?.ToString()
        };

        PresentViewController(alertController, true, null);
    }

    public void OnAuthenticationCanceled()
    {
        DismissViewController(true, null);

        var alertController = new UIAlertController
        {
            Title = "Authentication canceled"
            Message = "You didn't completed the authentication process"
        };

        PresentViewController(alertController, true, null);
    }
}